Sunday, December 7, 2014

Decorations for Christmas - make your own Gold Holly


Holly, with its glossy red leaves and it's red berries, is a universal decoration for Christmas.  This post will show you how to make your own Holly to use for Christmas decorations. Once made it can be used for door decorations table, table decorations or across the top of furniture within your house. Any flat surface will do.  


Materials needed.   Gold spray paint, Holly, drop cloth.  

First, cut or buy enough Holly to cover the areas that you want to decorate.  Holly trees have variety that obly have green leaves but no berries, this is a good for filler,  volume and background. Holly trees also have the variety which will have the red berries. Make sure that you have enough of this Holly to be on the top and the front of your decorations.   

Second, spread The drop cloth outside in a garage or shed or backyard or balcony. Place the Holly front side down and spray the back of the leaves with a very strong coat of spray paint. Let dry.  


Third, turn the Holly branches over and do a very light dusting of the spray paint to the look that you desire.  You may want to do some leaves completely gold, you may want to only have a hint of gold so that the green leaves and red berries are present.  

Fourth, when dry place holly leaves holly branches in a bucket of water to keep them fresh. Keep them outside while the spray paint fully dries and the fumes release, about a week or two.

Finally, bring the branches inside and trim to fit the space that you are decorating. For example on dinner table decorations decorations you will want longfin branches that you could arrange down the center of the table and illuminate with battery-powered LED. For A credenza table decoration you will want branches that are more full.  

Hint: place your LED lights down first.  Put the holly in place.  pull the LED lights up through the Holly to illuminate it softly, put gold balls and gold ribbon woven throughout the Holly.  

Hint: it is best to spray paint the folly three weeks before Christmas and leave it outside for two weeks to get rid of all of the fumes from the spray paint. 

Hint: if you are using Christmas lights to illuminate your display of Holly, use the LED lights that stay cool.  

Saturday, February 8, 2014

Rosemary Chicken Recipe

Rosemary Chicken is a classic Italian chicken recipe.  In the classic recipe the Rosemary is often paired with lemon.  Putting a lemon inside the cavity of the chicken, or using lemon juice in place of the balsamic in this recipe might give a more classic dish.  My preference is to use balsamic vinegar in place of the lemon.  It is always in the pantry, while I may not always have a fresh lemon in the fridge.  In this recipe, Rosemary, olive oil and balsamic vinegar make the basis of the sauce. 

Lay sprigs of Rosemary across bottom of baking pan.  Cover with olive oil and balsamic vinegar to the depth of about 1/2 inch.  Add red wine in place of some of the balsamic vinegar.  Add hot sauce (doesn't make it hot, just adds flavor). 

Add salt, black pepper, red pepper flakes (red pepper flakes will make it hot if enough is added).

Add Garlic and onions. 
(You can also add other vegetables around the edge like a pot roast.  Potatoes/carrots/celery etc.)


Add the chicken breasts.  I buy the thin cut ones or I cut regular chicken breasts to half the thickness.

Marinate the chicken breasts.  Use two forks, tines down, to tenderize the chicken by piercing with the forks while in the marinade. 

Bake at 3:50 until the chicken breasts are done. 


Aunt Yoland's Honeyed Ricotta Recipe

This simple Honeyed Ricotta recipe dates back generations in Italian families. It can be used at breakfast to be served as a topping or spread for breads, quick breads, pancakes, biscuits, english muffins, bagels and any other breakfast dish. For desserts, serve it on the side as a healthy alternative to ice cream for baked apples and other desserts.

This honeyed ricotta recipe can become a breakfast routine for those on low carb diets.
Things you'll need:
1 cup Ricotta
1/3 cup honey
1/2 tsp sea salt
1 tsp sugar (optional)

1 Gather all ingredients and bring them to room temperature. If the Ricotta is too cold it will solidify the honey and it will not mix. If cold you will end up with solid pieces of honey in the Ricotta. To bring Ricotta to room temperature, leave it out overnight (but not longer as it is dairy and needs to be refriderated). A better alternative is to put the Ricotta in the microwave at half power and heat and stir occassionally until it is room temperature.
2 Mix all ingredients in a mixing bowl. Adjust the honey and sugar to taste. Move to a glass serving bowl and serve with breakfast breads.
3 Consider variations which may include orange zest, vanilla beans, fresh fruit, nuts, granola, or vanilla yogurt.

Linda's Southwest Chicken Soup Recipe

This soup recipe is for a simple but incredibly delicious and satisfying Southwest Chicken Soup. This can be made the old fashioned way by chopping all ingredients by hand before making, or, look in the frozen food section for equivalents.
See the 'tips' section at the bottom for how to make this chicken soup recipe into a Spicy Southwest Chicken Soup Recipe.

Things you'll need:
1/2 - 1 cup cubed chicken in 1 inch cubes.
1/2 cup chopped celery in 1/2 inch cubes
1/2 cup chopped carrots in 1/2 inch cubes
1/2 - 1 cup chopped potatoes in 1/2 inch cubes
2 medium onions chopped into 1/4 inch cubes.
Large can chicken stock small can tomatoes with chillies (such as rotelle) small can corn/drained. salt/pepper/sugar/chili powder/sprinkle nutmeg.
Olive oil for sauteeing.

Tips
If you want to make spicy southwest chicken soup make two adjustments. Make a mixture of 1/2 paprika and 1/2 chilli powder. Do not drain the can of tomatoes with chilli' s and add with the rest of the ingredients.

1 Prepare the ingredients. Assemble all of the ingredients and start chopping the vegetables. Chop the chicken breasts when the vegetables are finished. Place each of the chopped ingredients into their own bowls. Clean all surfaces to make sure there is no contamination from the raw chicken.

2 Sauté in olive oil and paprika. Start two pans on the stove top and medium to high heat. In the larger one add the onion. Sprinkle the onion liberally with paprika, salt and pepper. Sauté until translucent stirring to coat all of the onion in the paprika. At the same time in the other pan, add the celery to the hot oil, sprinkle liberally with paprika and add salt and pepper. Stir so that the celery is coated in paprika. Remove the onion with a slotted spoon and add the chicken cubes. Again sprinkle with paprika, salt and pepper. Sauté until done, stirring constantly. Remove the celery with a slotted spoon and add the carrots. Sprinkle with paprika/salt/pepper.
3 Combine all ingredients in a large soup pot. Put the large can of chicken stock into the large soup pot. Add all other ingredients except the can of Tomatoes with chilli's. Bring to a boil and drop to a simmer. Taste and adjust spices. Just before you are ready to serve drain the can of tomatoes and chillies and add. Taste and adjust spices for the last time.


Turkey Stuffing or Chicken Stuffing Recipe

This is a good recipe for chicken stuffing and dressing which also serves well as a recipe for turkey stuffing and dressing. It is simple, can be used throughout the year although it shines as a thanksgiving recipe.

The versatility of this stuffing and dressing recipe is very helpful. The bread can be changed to cornbread to make cornbread stuffing. Substitute vegetable broth to make it a vegetarian stuffing recipe.


Things you'll need:
4 cups bread crumbs (toasted white bread, toasted whole grain bread, cornbread or prepared stuffing such as stove top or Pepperidge Farm Herb Seasoned Stuffing.)
1 stick Margarine or Butter
2.5 to 3.0 cups vegetable or chicken broth (or water)
If using plain bread crumbs season them with 1 tsp dried or fresh parsley, 1/2 tsp garlic powder, 1/2 tsp sage, 3/4 tsp salt, 1/2 tsp pepper. Adjust the seasoning to your taste.

1/2 cup finely diced carrots
1/2 cup finely diced celery
1/4 cup finely diced onions (optional)
turkey and baking until it is warmed through.
Tips
Grow sage and parsley in your garden to make a homemade stuffing with organic sage recipe.

1 Assemble and prep bread crumbs If you are toasting bread or cornbread for this recipe do this in the toaster or lay the bread flat on a jelly roll try under the broiler watching it constantly and turning over at the right time. If making cornbread stuffing cut the cornbread into slices the same thickness as sandwich bread slices. When toasted, let it cool on racks so all moisture is released. When at room temperature, decide how fine you want the crumbs. If you want a course texture put into a large mixing bowl and break apart by hand. If you want a fine texture place a couple handfuls at a time into the blender or food processor, pulse and pour into the mixing bowl. If you are working with prepared stuffing base, just place that into the mixing bowl.
2 Assemble and prep vegetables Very finely dice the carrots, celery and onions so they are unobtrusive in the bread crumb mixture, about 1/2 to 1/4 inch dices. Sauté the vegetables in three separate batches. Start with the celery, heat a sauté pan and use either olive oil or butter to sauté, while sauteing sprinkle a little salt and pepper on the celery. Sauté until they just begin to be translucent. Pour into the mixing bowl with the bread crumbs. Next do the onions in the same pan and finally the carrots. If you do the carrots first they will turn the other two orange. This is a step you can do the weekend before Thanksgiving if you are using this as a Thanksgiving turkey stuffing and dressing recipe. If doing ahead, just leave the vegetables on separate plates to cool. When at room temperature place into three small sandwich zip top bags and leave in the vegetable drawer of your refrigerator until Thanksgiving morning.
3 Assemble and Prep all other ingredients Melt the butter, measure the spices and place into the large mixing bowl. Stir until all ingredients are evenly incorporated.
4 Add the liquid If you are serving this right away you will want to make sure the liquid is piping hot. If you are using this as a chicken stuffing recipe or a turkey stuffing recipe you will want to use room temperature liquid and stuff the poultry just before it goes into the oven. You can also make this into a crockpot stuffing recipe by adding cool liquid and placing all ingredients into the crockpot on high until it is warmed through and can be served. Or you can make this into a stuffing casserole recipe by adding the liquid then placing it into a baking pan with one inch squares of chicken or

Crockpot Apple Cider Recipe


Things you'll need:
1 gallon apple cider
2 slices of apple
8 cloves
2 tablespoons brown sugar
2 cinnamon sticks

1 Fill Crockpot with cider. Buy the crystal clear cider that is found on the grocery shelves next to the apple juice. Do not use the apple cider that is found in the produce section refridgerated.
2 Add the spices. Cut the two slices from the apple at the widest point. Lay the apple on its side and cut from the middle. When you take your slices out they will have a star in the middle, remove any visible seeds. Push the cloves into the apple slices, with half placed in each of the apple. Drop in the cinnamon sticks and brown sugar.
3 Heat apple cider. Turn the crockpot to high initially and then drop it back to medium as your guests arrive.
4 Serve. Use glass mugs or punch cups that can tolerate the heated beverage.
Your house will smell like the holidays and your guests will be warmed through with the cider. Make it easy on yourself and use your crockpot!

Grandma's Lemon Cake Recipe

This Lemon Cake or lemon cupcake recipe is fast and the absolute best lemon cake recipe. Use this as a dessert for a summer dinner, a spring party or in the winter to mix up the parade of winter desserts. This easy lemon cake recipe is made with a lemon cake mix and a box of Lemon gelatin mix, resulting a very moist lemon cake.


Things you'll need:
Lemon Cake Mix and ingredients called for on the box mix
Lemon gelatin mix.
Optional - lemon frosting or lemon icing

1 Make the lemon cake mix Following the directions on the box, make the lemon cake in either a 9x13 pan or as cupcakes. Remove the cake from the oven at the appropriate time and when a knife or skewer plunged into the middle and removed comes out clean.
2 Mix Lemon gelatin mix Using a small box of the lemon gelatin mix with only the hot water called for in the recipe (this will be half of the total amount of water, you will not use the cold water called for on the box.)
3 Make openings in the top of the cake While the cake is still warm, just from the oven, use a knife or fork to make holes throughout the cake at two to four inch intervals. Pour the gelatin mix into these holes. If the gelatin mix runs off the cake instead of penetrating, try placing the knife into the cake straight down, then slant slightly to the left (if you are right handed, or right if you are left handed) and then pour the gelatin mix into the opening made by the knife. Repeat until you have poured the gelatin mix evenly throughout the cake.
4 Frost if desired If desired, frost or ice the cake with lemon flavored frosting or icing. Keep with the theme of a quick and easy lemon cake, buy lemon frosting at the store and use it from the container.

Paprika Chicken Recipe

This delicious chicken recipe makes an elegant meal with leftovers that blend into many different meals over the rest of the week. This low carb chicken recipe is a family favorite and goes well with any variety of side dishes. Freeze the chicken breasts and save for when you need to pull a fast meal together!


Things you'll need:
Chicken Breasts (or legs)
Olive Oil
Salt & Pepper
Paprika
 Chili Powder
Nutmeg

1 Step 1 - Prepare Chicken Breasts or Thighs Remove from package (if frozen, thaw first) and rinse. (See the link below to the USDA's information sheet on how to safely handle poultry in the kitchen.) If the breasts are thick, slice or filet them to make two thin portions of equal size. This can be hard to do, to make it simpler, place the chicken breast flat on a plate and pierce with a form about one inch in from the edge to hold in place. If you are right handed do this on the right side, opposite for lefties. Using a sharp knife with a long blade, rest the blade on the edges of the plate which is hopefully about half way up the thickness of the chicken breast. Cut in until you touch the fork. Holding the chicken breast in place with the knife, remove the fork and place it on the cut edge behind the knife. Now you will be able to 'pull' against the fork to cut the rest of the breast.
2 Step 2 - Season the Chicken Salt and Pepper both sides of the chicken and let it rest. During this time, mix together: Paprika - 10 teaspoons Salt - 1 teaspoon Pepper - 1 teaspoon Chili Powder - 1 teaspoon Nutmeg - .5 teaspoon In a skillet with a large, flat bottom and substantial sides, heat olive oil until just below smoking. Keep the Olive Oil at hand to continually add more after each batch of chicken.
3 Step 3 - Cook the chicken In a plate lay two to three pieces of chicken flat, cover with the Paprika Spice mixture. Pick these up with a fork and lay them spice side down into the oil. Now cover the unseasoned sides with the paprika spice mixture. Cook on the first side until the bottom is nicely browned for an overall reddish brown color. Flip with the fork. Cook on the second side until the juices run clear when punctured at the thickest point, the chicken is white throughout and the second side is a beautiful reddish brown. Remove to a plate lined with paper towels. Repeat until all chicken pieces are done.

Easy Bruchetta Recipe

There is nothing faster than Bruschetta to serve your guests as an appetizer or whip up for lunch during the summer. When the Tomatoes and Basil are fresh, this is as good as cooking gets. Fresh ingredients prepared simply is the essence of summer. The problem is you don't want to make it because you are trying to avoid the heat of either a grill or the broiler. This recipe will show you a quick way to make bruschetta without heating up the kitchen.

Things you'll need:
Italian bread - presliced
Tomatoes
Basil
Mozzarella (wet)
Olive Oil
Sea Salt
Black Pepper
Balsamic Vinegar (optional)

1 First - Collect the ingredients. Selecting the freshest ingredients, assemble all of them together.
2 Second - Prepare the ingredients. Slice the tomatoes. Toast the bread. Slice the mozzarella.
3 Third - Assemble the ingredients. Use the basil to help the toast keep its crispness. Put the basil on top of the toasted bread, then add tomato slices. Salt and pepper the tomato slices and the mozzarella slices. Add mozzarella slices on top. Drizzle with olive oil.
4 Last - Cook. Place the assembled bruschetta on a plate. Put it in the microwave for 30 seconds or less. Just until the mozzarella melts. This will depend on how thick the slices are cut. When you remove it from the microwave the mozzarella will be melted, but not browned as it would be if it had been broiled. Optionally you can drizzle with balsamic vinegar to give it some color.


Quick Blueberry Cobbler Recipe

Blueberry Cobbler brings back memories of summers past. The steaming, sweet blueberries with a thick cobbler crust piping hot and smothered in icecream or heavy cream straight from the carton. This is summer living at its best!

Things you'll need:
One jar Blueberry Pie Filling
1 to 2 jars Blueberries in Heavy Syrup
9x13 Baking Dish
Biscuit topping

1 First preheat oven to 400 degrees Ferenheight.
2 Second open your jar (or two cans) of blueberry pie filling. Empty into a 9x13 baking dish. Then, open the can of blueberries (use two for more fruit filling) drain half of the syrup into the sink and half of the syrup into the empty jar of blueberry pie filling. Place the blueberries into the baking dish. Put the top on the jar of pie filling and shake until the syrup from the can of blueberries has loosened all of the pie filling from the inside of the jar. Take off the top and put this liquid into the baking dish as well. Mix all together with a spoon. Place in oven.
3 Place the baking dish with the blueberry mix into the oven. The blueberries need to be heated to the temperature that the need to be cooked or else you will have a layer in the middle of the cobbler of unbaked biscuits between the blueberries and the biscuit mix. Heating the blueberries will be about 20-30 minutes.
4 Once the blueberries are in the oven to heat up. Prepare the topping. This can be as quick as flattening out an entire package of Pillsbury Crescent Rolls and placing on top of the heated blueberies. Or, use the Biscuit mix to create a biscuit dough. Remember to always add the liquids to the dry ingredients quickly and stir until just wet.
5 Take the hot blueberries out of the oven with oven mits and place on a heat proof surface. Lay out the Crescent rolls if you are using them. Or, drop the biscuit mix by spoonfuls until all of the areas are covered. It is OK for this to look lumpy, it adds to the rustic charm or this classic dessert.
6 Sprinkle the top of the blueberry cobbler with sugar (to glaze the top) and return to the oven until a knife plunged into the center comes out clean of any dough. Remove from oven and let it cool until it is comfortably warm. About an hour.
7 Serve in a bowl or plate with vanilla icecream or whipped cream. Or, as Grandmother used to do, pour heavy cream over the serving.

How to Crystalize Violets

Violets are one of the many edible flowers that can be crystalized and used for decorating desserts or used in salads. Be sure you pick violets that have not had any pesticides or herbicides applied directly or in the vacinity

1 Pick the violets within a couple hours of serving them.

2 Wash the violets well. Wash them in a bowl so that the petals do not get crushed in the stream of water from the faucet.

3 Brush the violet petals with beaten egg whites with a small pasty brush.
4 Sprinkle the violets with granulated sugar. Put on wax paper to dry.
5 When the violets are dry decorate the dessert. The violets are light enough that they will tuck directly in the frosting and adhere to the side of the cake with no other support. The violets will look fresh for 12 hours but after that they may begin to look bruised.
6 The violets are edible. The violets taste the way freshly cut grass smells. Some will enjoy the taste, others will only nibble politely. Do not push your guests into eat them!

How to Care for Houseplants in Winter

Houseplants are under assault during the winter months. With care you can help you houseplants survive winter and even thrive under your care.

Do you miss the blooms of summer when there are no leaves on the trees? Do you want fresh cut flowers in February? With care you can help all of your houseplants to be at their best in winter.

1 Sun - With shorter winter days, the most important thing for houseplants is to have a sunny Southern windows. Even African violets will enjoy a southern window in the winter months with shorter days and weaker sun rays.
2 Water - Make sure you water your houseplants regularly. The houseplants never want to be too dry or too wet. Use a houseplant Moisture Soil Tester and water the houseplant when it reads #2 of #4 or approx 25%.
3 Planting - Plant the houseplants in whatever plastic container you want - this will never been seen. Just make sure the container has drainage holes. Then, buy a good looking copper, brass or other impermeable container (never trust pottery). Place some 1 to 2 inch rocks or gravel in the bottom of the metal container and then place the plastic container within. When you water the plant, some water will run through pool in the bottom of the outer, metal container, as this evaporates your houseplant will benefit from the humidity. Often plants will drop a root down to the bottom where they can catch the run- off water. The metal will protect your furniture.
4 Fertilize - Your plants will really POP when they get fertilized at least once a month.
5 Repotting - After winter move houseplants to larger pots in the spring when light and warmth are abundant. Avoid repotting houseplants in the winter. If you must repot a houseplant, consider tenting the houseplant in its new pot with clear plastic to help avoid stress while it adjusts to its new pot.

Things you'll need:
Required - Sunlight
Required - Containers that do not leak
Optional - Moisture tester

Tips and Warnings
If you prefer baskets instead of metal containers to match your household decor, just add one more layer. Plant goes in pot with drainage holds. Plant in pot go into the metal container that is impermeable to water. Plant in pot in metal container go into a larger basket!
Thrift stores are a great place to find the metal containers - just make sure they have no seams and you cannot see any light through the bottom.

How to Plan a Small Garden

Are you gardening in a small space? Do you have an urban garden? Are you landscaping a new garden design for your backyard? Are you container gardening on a patio or balcony? Do you have a rock garden in a small space? This article will give you gardening tips for planning a small garden.

1 When creating a small space landscaped garden consider which of these elements you want to include. Vegetables, Flowers, Seating areas or Outdoor Rooms for dining or relaxing, or a Water Feature. By hand or using garden design software measure and draw out the existing space. Start watching and walking through the space at diferent times of the day and taking notes. The steps below describe what you are looking for..
2 The most private spot - Decide if you want to put two chairs and a small table here to drink coffee and read the paper in the morning and have a glass of wine in the evening -OR- if you would prefer to use this private spot for the things you dont want your neighbors to see (trash cans, grill, compost bin).
3 View - This might be a view of the sky, a planting in your garden, the view back to your house, a stand of trees. This is where you will plan a space for entertaining, your outdoor room, or the intimate spot for coffee and newspaper in the morning. If you have a view you need to block out quickly (back of an apartment building) consider installing concrete troughs along the fence and planting with bamboo. In a small space garden never plant bamboo into the ground as it will take over. Also, having it raised in a concrete trough will 2 - 3 feet closer to the obstructing the undesirable view.

4 Vegetables - Find the sunniest, warmest spot. Hopefully you have a southern portion of your yard. In order of preference the best exposures for vegetables are southeast, southwest, east, west, north. An eastern exposure is preferred because the sun first thing in the morning will start the days growth cycle early.

5 Flowers - There are so many varieties that flowers will grow in deep shade, light shade, partial sun, full sun. Just observe the location, go to the garden center or local nursery, describe the conditions and they will help you find plants that will thrive. If you have an area where nothing will grow, consider a zen rock garden. In a small space less can be more.

6 Garden Water features - Determine your requirements, do you want to be able to see from the house, hear it from your bedroom window, see the fish while sitting in your garden? The water feature will require moderate amount of sun.

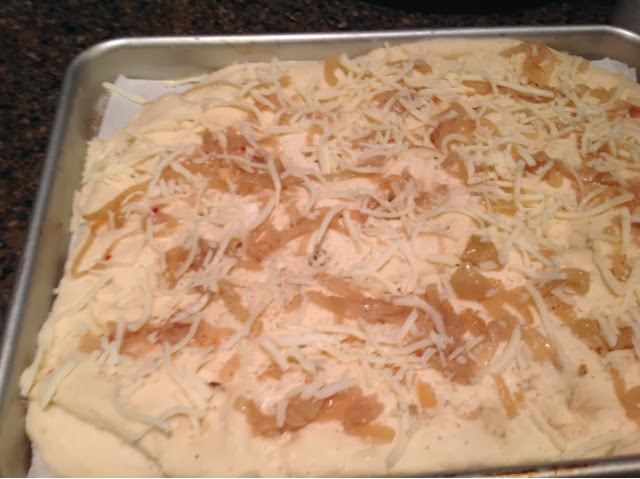
Onion Focaccia Recipe

Start by simmering garlic in olive oil.

Make this recipe for the dough:

http://allrecipes.com/recipe/quick-and-easy-pizza-crust/

Use the garlic infused olive oil for the oil in the dough.

Caramelize two large onions in olive oil.

Assemble Kosher salt, black pepper, red pepper and grated mozzarella.

Split the dough into two sections.

Roll out the first section in a low sided pan lined with parchment paper.  Use your finger tips to dimple the top of the dough.  Sprinkle with caramelized onions, garlic and the olive oil it was sautéed in, red pepper, black pepper, salt.

Roll out the second half of the dough, place on top of the first and use the same toppings. 

Cook in a hot oven, at least 425, until the center is cooked through and the mozzarella on top has turned a gorgeous brown.

Focaccia Recipe


Focaccia ready to go into the oven


Onions and olive oil ready to be carmelized

Caramelized onions.  


The recipes posted on this blog are intended primarily for my convenience.  They are posted the way I was taught to cook, by verbal history passed down through generations.  No "1/4 teaspoon measurements here...  My Mother-in-Law never measured, therefore she could not give me measurements.  Almost every recipe started with, 'You start with the garlic, heat it in the olive oil...'  When I asked, how much garlic?  The response was typically, '...THE garlic...'. 

If you are using these recipes, hopefully you will capture the flavor profile and create your own measurements to make them yours.  Please put your modifications in the comments and continue the verbal history of our predecessors, albeit, in our own digital manner. 

If you cook with the precision of my electrical engineer Sister-in-Law, as if you are mixing combustible chemicals where a mistake will result in bodily harm, move on.  There is nothing for you to see here.  This is not the website for you. 

A Note About the Recipes on This Website

The recipes posted on this blog are intended primarily for my convenience.  They are posted the way I was taught to cook, by verbal history passed down through generations.  No "1/4 teaspoon measurements here...  My Mother-in-Law never measured, therefore she could not give me measurements.  Almost every recipe started with, 'You start with the garlic, heat it in the olive oil...'  When I asked, how much garlic?  The response was typically, '...THE garlic...'. 

If you are using these recipes, hopefully you will capture the flavor profile and create your own measurements to make them yours.  Please put your modifications in the comments and continue the verbal history of our predecessors, albeit, in our own digital manner. 

If you cook with the precision of my electrical engineer Sister-in-Law, as if you are mixing combustible chemicals where a mistake will result in bodily harm, move on.  There is nothing for you to see here.  This is not the website for you. 

Friday, January 17, 2014

Linda's Pizza


You always start with the garlic....

Simmer garlic in olive oil (enough for the dough and more to brush on the surface of the dough after it is rolled out.  


Be sure to use a glass or ceramic bowl, never aluminum.  Use olive oil that has been infused with garlic. 

Split the dough into two equal parts.   Roll it out to fit the pan or stone.  Tap the surface with two forks to 
keep the dough from rising in the middle.  Brush with the garlic infused olive oil.  

A this point, place it onto your preheated pizza stone.  The baking surface is important.  Preheat your pizza stone by leaving it in the oven as it heats to 450. Or, if you do not have a stone, or to make a very crisp crust with a more olive oil flavor, use a low-sided baking pan (jelly roll pan) and put it in the oven to heat up. 5 mins before you put the dough on it, add a fine layer of olive oil across the bottom of the pan.  

Then put the toppings on. 

Salt, black pepper, red pepper and, if desired, oregano the top then put into a 450 or 500 degree oven.  

Remove from the oven when the mozzarella is beginning to turn brown.  If the pizza dough is thick, make sure it 
has cooked through in the center.  

Pesto, carmelized onions and mozzarella pizza recipe . 


The recipes posted on this blog are intended primarily for my convenience.  They are posted the way I was taught to cook, by verbal history passed down through generations.  No "1/4 teaspoon measurements here...  My Mother-in-Law never measured, therefore she could not give me measurements.  Almost every recipe started with, 'You start with the garlic, heat it in the olive oil...'  When I asked, how much garlic?  The response was typically, '...THE garlic...'. 

If you are using these recipes, hopefully you will capture the flavor profile and add your own measurements to make them yours.

If you cook with the precision of my electrical engineer Sister-in-Law, as if you are mixing combustible chemicals where a mistake will result in bodily harm, move on.  There is nothing for you to see here.  This is not the website for you.