Violets are one of the many edible flowers that can be crystalized and used for decorating desserts or used in salads. Be sure you pick violets that have not had any pesticides or herbicides applied directly or in the vacinity
1 Pick the violets within a couple hours of serving them.
2 Wash the violets well. Wash them in a bowl so that the petals do not get crushed in the stream of water from the faucet.
3 Brush the violet petals with beaten egg whites with a small pasty brush.
4 Sprinkle the violets with granulated sugar. Put on wax paper to dry.
5 When the violets are dry decorate the dessert. The violets are light enough that they will tuck directly in the frosting and adhere to the side of the cake with no other support. The violets will look fresh for 12 hours but after that they may begin to look bruised.
6 The violets are edible. The violets taste the way freshly cut grass smells. Some will enjoy the taste, others will only nibble politely. Do not push your guests into eat them!
Saturday, February 8, 2014

How to Care for Houseplants in Winter
Houseplants are under assault during the winter months. With care you can help you houseplants survive winter and even thrive under your care.
Do you miss the blooms of summer when there are no leaves on the trees? Do you want fresh cut flowers in February? With care you can help all of your houseplants to be at their best in winter.
1 Sun - With shorter winter days, the most important thing for houseplants is to have a sunny Southern windows. Even African violets will enjoy a southern window in the winter months with shorter days and weaker sun rays.
2 Water - Make sure you water your houseplants regularly. The houseplants never want to be too dry or too wet. Use a houseplant Moisture Soil Tester and water the houseplant when it reads #2 of #4 or approx 25%.
3 Planting - Plant the houseplants in whatever plastic container you want - this will never been seen. Just make sure the container has drainage holes. Then, buy a good looking copper, brass or other impermeable container (never trust pottery). Place some 1 to 2 inch rocks or gravel in the bottom of the metal container and then place the plastic container within. When you water the plant, some water will run through pool in the bottom of the outer, metal container, as this evaporates your houseplant will benefit from the humidity. Often plants will drop a root down to the bottom where they can catch the run- off water. The metal will protect your furniture.
4 Fertilize - Your plants will really POP when they get fertilized at least once a month.
5 Repotting - After winter move houseplants to larger pots in the spring when light and warmth are abundant. Avoid repotting houseplants in the winter. If you must repot a houseplant, consider tenting the houseplant in its new pot with clear plastic to help avoid stress while it adjusts to its new pot.
Things you'll need:
Required - Sunlight
Required - Containers that do not leak
Optional - Moisture tester
Tips and Warnings
If you prefer baskets instead of metal containers to match your household decor, just add one more layer. Plant goes in pot with drainage holds. Plant in pot go into the metal container that is impermeable to water. Plant in pot in metal container go into a larger basket!
Thrift stores are a great place to find the metal containers - just make sure they have no seams and you cannot see any light through the bottom.
Do you miss the blooms of summer when there are no leaves on the trees? Do you want fresh cut flowers in February? With care you can help all of your houseplants to be at their best in winter.
1 Sun - With shorter winter days, the most important thing for houseplants is to have a sunny Southern windows. Even African violets will enjoy a southern window in the winter months with shorter days and weaker sun rays.
2 Water - Make sure you water your houseplants regularly. The houseplants never want to be too dry or too wet. Use a houseplant Moisture Soil Tester and water the houseplant when it reads #2 of #4 or approx 25%.
3 Planting - Plant the houseplants in whatever plastic container you want - this will never been seen. Just make sure the container has drainage holes. Then, buy a good looking copper, brass or other impermeable container (never trust pottery). Place some 1 to 2 inch rocks or gravel in the bottom of the metal container and then place the plastic container within. When you water the plant, some water will run through pool in the bottom of the outer, metal container, as this evaporates your houseplant will benefit from the humidity. Often plants will drop a root down to the bottom where they can catch the run- off water. The metal will protect your furniture.
4 Fertilize - Your plants will really POP when they get fertilized at least once a month.
5 Repotting - After winter move houseplants to larger pots in the spring when light and warmth are abundant. Avoid repotting houseplants in the winter. If you must repot a houseplant, consider tenting the houseplant in its new pot with clear plastic to help avoid stress while it adjusts to its new pot.
Things you'll need:
Required - Sunlight
Required - Containers that do not leak
Optional - Moisture tester
Tips and Warnings
If you prefer baskets instead of metal containers to match your household decor, just add one more layer. Plant goes in pot with drainage holds. Plant in pot go into the metal container that is impermeable to water. Plant in pot in metal container go into a larger basket!
Thrift stores are a great place to find the metal containers - just make sure they have no seams and you cannot see any light through the bottom.
How to Plan a Small Garden
Are you gardening in a small space? Do you have an urban garden? Are you landscaping a new garden design for your backyard? Are you container gardening on a patio or balcony? Do you have a rock garden in a small space? This article will give you gardening tips for planning a small garden.
1 When creating a small space landscaped garden consider which of these elements you want to include. Vegetables, Flowers, Seating areas or Outdoor Rooms for dining or relaxing, or a Water Feature. By hand or using garden design software measure and draw out the existing space. Start watching and walking through the space at diferent times of the day and taking notes. The steps below describe what you are looking for..
2 The most private spot - Decide if you want to put two chairs and a small table here to drink coffee and read the paper in the morning and have a glass of wine in the evening -OR- if you would prefer to use this private spot for the things you dont want your neighbors to see (trash cans, grill, compost bin).
3 View - This might be a view of the sky, a planting in your garden, the view back to your house, a stand of trees. This is where you will plan a space for entertaining, your outdoor room, or the intimate spot for coffee and newspaper in the morning. If you have a view you need to block out quickly (back of an apartment building) consider installing concrete troughs along the fence and planting with bamboo. In a small space garden never plant bamboo into the ground as it will take over. Also, having it raised in a concrete trough will 2 - 3 feet closer to the obstructing the undesirable view.
4 Vegetables - Find the sunniest, warmest spot. Hopefully you have a southern portion of your yard. In order of preference the best exposures for vegetables are southeast, southwest, east, west, north. An eastern exposure is preferred because the sun first thing in the morning will start the days growth cycle early.
5 Flowers - There are so many varieties that flowers will grow in deep shade, light shade, partial sun, full sun. Just observe the location, go to the garden center or local nursery, describe the conditions and they will help you find plants that will thrive. If you have an area where nothing will grow, consider a zen rock garden. In a small space less can be more.
6 Garden Water features - Determine your requirements, do you want to be able to see from the house, hear it from your bedroom window, see the fish while sitting in your garden? The water feature will require moderate amount of sun.
1 When creating a small space landscaped garden consider which of these elements you want to include. Vegetables, Flowers, Seating areas or Outdoor Rooms for dining or relaxing, or a Water Feature. By hand or using garden design software measure and draw out the existing space. Start watching and walking through the space at diferent times of the day and taking notes. The steps below describe what you are looking for..
2 The most private spot - Decide if you want to put two chairs and a small table here to drink coffee and read the paper in the morning and have a glass of wine in the evening -OR- if you would prefer to use this private spot for the things you dont want your neighbors to see (trash cans, grill, compost bin).
3 View - This might be a view of the sky, a planting in your garden, the view back to your house, a stand of trees. This is where you will plan a space for entertaining, your outdoor room, or the intimate spot for coffee and newspaper in the morning. If you have a view you need to block out quickly (back of an apartment building) consider installing concrete troughs along the fence and planting with bamboo. In a small space garden never plant bamboo into the ground as it will take over. Also, having it raised in a concrete trough will 2 - 3 feet closer to the obstructing the undesirable view.
4 Vegetables - Find the sunniest, warmest spot. Hopefully you have a southern portion of your yard. In order of preference the best exposures for vegetables are southeast, southwest, east, west, north. An eastern exposure is preferred because the sun first thing in the morning will start the days growth cycle early.
5 Flowers - There are so many varieties that flowers will grow in deep shade, light shade, partial sun, full sun. Just observe the location, go to the garden center or local nursery, describe the conditions and they will help you find plants that will thrive. If you have an area where nothing will grow, consider a zen rock garden. In a small space less can be more.
6 Garden Water features - Determine your requirements, do you want to be able to see from the house, hear it from your bedroom window, see the fish while sitting in your garden? The water feature will require moderate amount of sun.
Onion Focaccia Recipe
Start by simmering garlic in olive oil.
Make this recipe for the dough:
http://allrecipes.com/recipe/quick-and-easy-pizza-crust/
Use the garlic infused olive oil for the oil in the dough.
Caramelize two large onions in olive oil.
Assemble Kosher salt, black pepper, red pepper and grated mozzarella.
Split the dough into two sections.
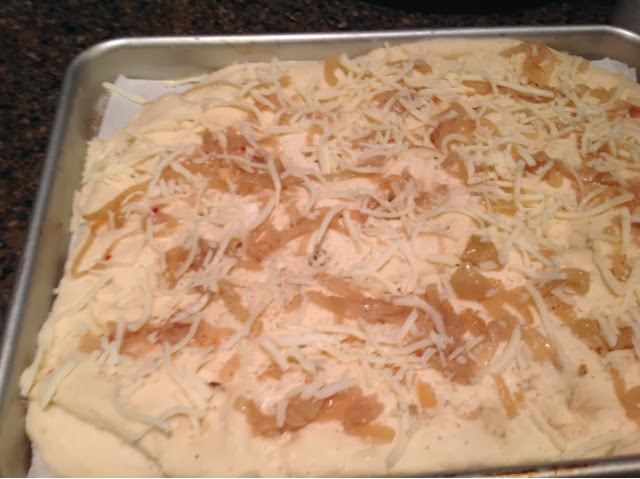
Roll out the first section in a low sided pan lined with parchment paper. Use your finger tips to dimple the top of the dough. Sprinkle with caramelized onions, garlic and the olive oil it was sautéed in, red pepper, black pepper, salt.
Roll out the second half of the dough, place on top of the first and use the same toppings.
Cook in a hot oven, at least 425, until the center is cooked through and the mozzarella on top has turned a gorgeous brown.
Focaccia Recipe

Focaccia ready to go into the oven
Onions and olive oil ready to be carmelized


The recipes posted on this blog are intended primarily for my convenience. They are posted the way I was taught to cook, by verbal history passed down through generations. No "1/4 teaspoon measurements here... My Mother-in-Law never measured, therefore she could not give me measurements. Almost every recipe started with, 'You start with the garlic, heat it in the olive oil...' When I asked, how much garlic? The response was typically, '...THE garlic...'.
If you are using these recipes, hopefully you will capture the flavor profile and create your own measurements to make them yours. Please put your modifications in the comments and continue the verbal history of our predecessors, albeit, in our own digital manner.
If you cook with the precision of my electrical engineer Sister-in-Law, as if you are mixing combustible chemicals where a mistake will result in bodily harm, move on. There is nothing for you to see here. This is not the website for you.
Make this recipe for the dough:
http://allrecipes.com/recipe/quick-and-easy-pizza-crust/
Use the garlic infused olive oil for the oil in the dough.
Caramelize two large onions in olive oil.
Assemble Kosher salt, black pepper, red pepper and grated mozzarella.
Split the dough into two sections.
Roll out the first section in a low sided pan lined with parchment paper. Use your finger tips to dimple the top of the dough. Sprinkle with caramelized onions, garlic and the olive oil it was sautéed in, red pepper, black pepper, salt.
Roll out the second half of the dough, place on top of the first and use the same toppings.
Cook in a hot oven, at least 425, until the center is cooked through and the mozzarella on top has turned a gorgeous brown.
Focaccia Recipe
Caramelized onions.
The recipes posted on this blog are intended primarily for my convenience. They are posted the way I was taught to cook, by verbal history passed down through generations. No "1/4 teaspoon measurements here... My Mother-in-Law never measured, therefore she could not give me measurements. Almost every recipe started with, 'You start with the garlic, heat it in the olive oil...' When I asked, how much garlic? The response was typically, '...THE garlic...'.
If you are using these recipes, hopefully you will capture the flavor profile and create your own measurements to make them yours. Please put your modifications in the comments and continue the verbal history of our predecessors, albeit, in our own digital manner.
If you cook with the precision of my electrical engineer Sister-in-Law, as if you are mixing combustible chemicals where a mistake will result in bodily harm, move on. There is nothing for you to see here. This is not the website for you.
A Note About the Recipes on This Website
The recipes posted on this blog are intended primarily for my convenience. They are posted the way I was taught to cook, by verbal history passed down through generations. No "1/4 teaspoon measurements here... My Mother-in-Law never measured, therefore she could not give me measurements. Almost every recipe started with, 'You start with the garlic, heat it in the olive oil...' When I asked, how much garlic? The response was typically, '...THE garlic...'.
If you are using these recipes, hopefully you will capture the flavor profile and create your own measurements to make them yours. Please put your modifications in the comments and continue the verbal history of our predecessors, albeit, in our own digital manner.
If you cook with the precision of my electrical engineer Sister-in-Law, as if you are mixing combustible chemicals where a mistake will result in bodily harm, move on. There is nothing for you to see here. This is not the website for you.
If you are using these recipes, hopefully you will capture the flavor profile and create your own measurements to make them yours. Please put your modifications in the comments and continue the verbal history of our predecessors, albeit, in our own digital manner.
If you cook with the precision of my electrical engineer Sister-in-Law, as if you are mixing combustible chemicals where a mistake will result in bodily harm, move on. There is nothing for you to see here. This is not the website for you.
Friday, January 17, 2014
Linda's Pizza
You always start with the garlic....
Simmer garlic in olive oil (enough for the dough and more to brush on the surface of the dough after it is rolled out.
Be sure to use a glass or ceramic bowl, never aluminum. Use olive oil that has been infused with garlic.
Split the dough into two equal parts. Roll it out to fit the pan or stone. Tap the surface with two forks to
keep the dough from rising in the middle. Brush with the garlic infused olive oil.
A this point, place it onto your preheated pizza stone. The baking surface is important. Preheat your pizza stone by leaving it in the oven as it heats to 450. Or, if you do not have a stone, or to make a very crisp crust with a more olive oil flavor, use a low-sided baking pan (jelly roll pan) and put it in the oven to heat up. 5 mins before you put the dough on it, add a fine layer of olive oil across the bottom of the pan.
Then put the toppings on.
Salt, black pepper, red pepper and, if desired, oregano the top then put into a 450 or 500 degree oven.
Remove from the oven when the mozzarella is beginning to turn brown. If the pizza dough is thick, make sure it
has cooked through in the center.
Pesto, carmelized onions and mozzarella pizza recipe .


The recipes posted on this blog are intended primarily for my convenience. They are posted the way I was taught to cook, by verbal history passed down through generations. No "1/4 teaspoon measurements here... My Mother-in-Law never measured, therefore she could not give me measurements. Almost every recipe started with, 'You start with the garlic, heat it in the olive oil...' When I asked, how much garlic? The response was typically, '...THE garlic...'.
If you are using these recipes, hopefully you will capture the flavor profile and add your own measurements to make them yours.
If you cook with the precision of my electrical engineer Sister-in-Law, as if you are mixing combustible chemicals where a mistake will result in bodily harm, move on. There is nothing for you to see here. This is not the website for you.
Wednesday, December 25, 2013
Cinnamon Rolls Recipe
Make dough for buttery dinner rolls using the bread machine. The more oil or butter in the dough will keep the dough soft after baking, and make it easier to work with while rolling. Turn out the dough and roll into a long rectangle that is very thin. If you leave the dough too thick the cinnamon rolls will be too bready. Melt in a glass measuring cup dark karo syrup, butter ( equal amounts), add cinnamon and nutmeg to taste. Sprinkle the dough with pecans (raisins at one end, G will complain if you make too many with raisins). Sprinkle with brown sugar and cinnamon. Pour on the melted butter mixture.


Cover the bottom of two pie pans with the melted butter mixture. If you want to flip the rolls and have the caranel top, Cover the bottom of the pan with at least a quarter of an inch, if not more. Put in a layer of pecans. To prevent it from getting hard at room temperature, consider omitting white and/ or brown sugar.
Roll up the dough. Cut into two inch lengths. Stand on end in the pie pan. If making the day ahead, store in the fridge overnight, or place in the oven with ice packs. In the morning, place in cole oven (or remove ice packs) and bake at 350 until browned.
The glaze has the same ingredients as cream cheese frosting. Except that I add cinnamon and nutmeg. Melt equal parts butter and cream cheese in a saucepan.
Then add one cup of powdered sugar at a time with approx one TBLspoon of milk with each new addition of sugar. Flavor with vanilla, and a sprinkle cinnamon and nutmeg. If it develops a sugary crust on top add more butter. Add more cream cheese and vanilla if the sugar flavor is too strong.
The recipes posted on this blog are intended primarily for my convenience. They are posted the way I was taught to cook, by verbal history passed down through generations. No "1/4 teaspoon measurements here... My Mother-in-Law never measured, therefore she could not give me measurements. Almost every recipe started with, 'You start with the garlic, heat it in the olive oil...' When I asked, how much garlic? The response was typically, '...THE garlic...'.
If you are using these recipes, hopefully you will capture the flavor profile and create your own measurements to make them yours. Please put your modifications in the comments and continue the verbal history of our predecessors, albeit, in our own digital manner.
If you cook with the precision of my electrical engineer Sister-in-Law, as if you are mixing combustible chemicals where a mistake will result in bodily harm, move on. There is nothing for you to see here. This is not the website for you.
If you are using these recipes, hopefully you will capture the flavor profile and create your own measurements to make them yours. Please put your modifications in the comments and continue the verbal history of our predecessors, albeit, in our own digital manner.
If you cook with the precision of my electrical engineer Sister-in-Law, as if you are mixing combustible chemicals where a mistake will result in bodily harm, move on. There is nothing for you to see here. This is not the website for you.
Subscribe to:
Posts (Atom)